Monthly Archives: September 2012
Bacon Cups with Scrambled Eggs
*Preheat oven as needed for cooking bacon. My oven is a little old and weird and I always cook at a higher temp than normal so I preheated to 450F.
INGREDIENTS:
* 3-4 eggs (will vary on how many cups you make)
* package of bacon (see ‘notes on recipe’ below)
* 1/2 to 1 medium onion, diced
* seasoning of choice for eggs (i chose garlic, salt and pepper)
STEP 1:
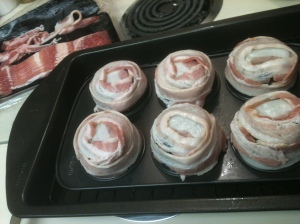
You will first prep and start cooking your bacon cups. I chose to use my cupcake tins and a deep baking pan.
The set up: Place your metal cupcake tin upside down and inside of a baking dish (one that is at least 1/2 an inch deep).
STEP 2:
Start wrapping the bacon slices around each raise cup. Make sure to wrap around and pull up to cover the top (this is your bottom!). Always stick the bacon to itself. You always want to overlap in some way. When the fat sticks to itself, it acts like glue.
* Note: Cut up a few slices of bacon and set aside for your filling.
Place in oven to cook. Your cooking time will vary. As I said above, my oven is old. I cooked mine at 450 for about 15-20 minutes. Usually you would start at 350-375F. Check on your bacon after 10 minutes and then every 5 minutes after that if you’re unsure of how your oven cooks.
STEP 3:
While your bacon cups are cooking, you want to go ahead and cook the filling for your cups.
* Note: If your ingredients don’t take long to cook, be mindful of how long your bacon is going to take. I waited about 10 minutes after I put my bacon in the oven before I started my eggs.
On your stovetop, cook up the bacon you set aside. When the bacon is almoset done, add your diced onion and cook until the onion is almost caramelized.
Then, add your choice of seasoning. I used salt, pepper and garlic. Then I added my eggs. I scrambled everything up and set aside when they were done cooking.
STEP 4:
When your bacon cups are done cooking, take them out and let them cool for about a minute. Using the backside of a butterknife, start below the bacon cup, sliding up against the tin and pusing the bacon cup up and off the cup. If it feels like it’s stuck and starting to pull apart, first make sure your bacon is fully cooked. If it is, then you may want to try and loosen the cup by pushing up from the bottom on all sides of the cup little by little just to loosen it. You shouldn’t have much issue with the bacon sticking to the tin because of the bacon grease.
STEP 5:
Now fill each bacon cup with your egg filling and enjoy! I served mine with tomato slices, seasoned with a little pepper and salt.
NOTES ON THE RECIPE:
* You have many opportunities to make adjustments to this recipe. You can chose to use any flavor of bacon and add any seasonings you wish.
* It’s best to use bacon cuts that are thinner and have a little more fat. So it’s best not to use ceneter cut, sodium free (this type is usally stiffer), or thick cut. Use what most refer to as the CHEAP type of bacon.
* Note: You will find many recipes from others on the interent on how to bake bacon cups. Some of which tell you to drill into your metal cupcake tins or simply cut into the disposable foil cupcake tins. It absolutely makes since for draining purposes, but I chose not to go this route. For one, I refuse to go to the extreme and destroy kitchenware. Two, I wasnt going to go out and buy the foil tins when I had another way to cook the cups with what I already had. Given, I do know that if I was to use either one of these methods, then the bacon may have come out crispier… but I was pleased with my results. Everything cooked evenly and stayed together.
* If you are afraid of the bacon not sticking to itself, you may want to try placing an additional cupcake tin on top, fitting over the bacon that is alreday placed on the first tin. Cook the bacon half way (bacon will start to curl during the first part of cooking) and then remove the top tin to finish cooking the bacon cups.
* I also thought of RE-cooking the bacon cups. Flip the tin, put the bacon cup inside the cup of the tin, placing the raw or half-cooked ingredients on top and filling the cup about 2/3rds full and cooking it in the oven. This way, you would have a solid cup that cooks everything togther. Be aware though, when re-cooking bacon with a raw ingredient like that, your bacon may soften up. But this shouldn’t matter because your egg misxture will hold everything together.
* This was my first attempt at this recipe and I am open to any suggestions or ideas on how to improve it.
-Elle.
Three Bottle of Maple Bacon Ale?? Yep!
My family brought bottles of Maple Bacon Ale to our family reunion. We ended up with three bottles! This is how I know my family loves me. 🙂
– Elle.


